Wednesday, May 27, 2009

Big Summer Project Has Begun

A few weeks ago, I had the thought that perhaps I should paint the exterior of The Dump before the next rainy season as there are some areas where the paint has failed and bare wood is exposed. I wondered how long it would take me to do this by myself as asking mom to help would be far different than asking for her help on an interior painting project.

Imagine my surprise when she pulled into the driveway mere days after I'd had that crazy notion and the first thing she said was, "We should paint your house this summer." I wasted no time on taking her up on that offer! We pulled paint chips that very day and narrowed it down to what I thought was a good color. Samples proved otherwise, so the color selection process continued.

Since I have a series of 3-day weekends coming up (Memorial Day, 4th of July, and a bunch of random Fridays we now have off as a token remuneration of our recent pay cut), I decided to get moving. Here are some progress pics from this past weekend:

Saturday - Scraping (not much since I have lead paint under there), patching and attempted gutter removal. Discovered the gutters will not come off AFTER we had demolished the downspouts int he removal process (oops!). No photos of this since it looked even uglier than before. Color was still uncertain at this time.

Sunday - Everything is primed and ready to go. Color rapidly selected and paint purchased (since the paint store would be closed on Monday). You know it was bad when a passing neighbor is totally impressed by the primer coat:
Monday - Eaves, rafter tails, fascia board and gutters painted white (with the "help" of my new power painter. Very messy, but good for getting into all the nooks and crannies of the eaves. I could not have done it without the help of a crew consisting of Mom, Uncle Tom and my beau, AT--thanks everyone!), window and garage door trim painted green so I could get the padlock back on the garage door:
Tuesday night (wanted to snap a pic before I ran out of daylight) - Yellow done on front wall so that I could unmask the front door:
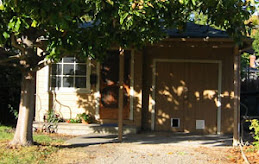
Wednesday morning - All cleaned up, unmasked and looking perky in the morning light:
Obviously, there is still a lot left to do, and this is only the first side of the house! However, it's a massive change and I think it will go a long way in boosting The Dump's curb appeal.

Once again, I'm reminded of the transformative power of paint. I heart you, paint!

Sunday, May 10, 2009

Yard work

So, it's been a while since I last posted, and I've been really busy in that time.

I painted and laid a new vinyl tile floor in the laundry room but I don't seem to have any real photos of that. I know I took some with my phone, but they aren't blog quality, so you'll just have to wait.

The weekends of the past month have been focused on the yard (aside from the weekend I lost to a business trip). Namely, I was keen to get my veggie bed going so that I will have some chance of having something edible before the season ends. I spent a weekend pulling weeds and working the soil and then planted the following weekend.

I went a bit crazy at the garden center:
6 types of tomatoes
a 6-pack of corn
a 6-pack of basil
Parsley
1 Cucumber
1 Zucchini
1 Crooked neck squash
1 sugar snap pea
1 watermelon
a 6-pack of lettuce

I'm pleased to say that I made it all fit:


Also a few weeks ago, I discovered buds on scraggly rose that I had pruned in January 2008, but had largely ignored since then. This weekend I got a pretty trellis and tied it up to the end of the front porch:

Cute, non?

And to round out this yard-loving post, my CA wildflowers are late to bloom, and not as well synchronized as I had hoped, but pretty nonetheless (I had wanted an explosion of blue lupine and orange poppies together, but the lupine is almost finished and the poppies are just beginning to open):

Sunday, March 22, 2009

It Pays to Have a Friend Who is an Artist

I know with absolute certainty the shade of green I want to paint the kitchen in the final remodeled version with white cabinets, dark hardwood floors and my lovely "Cashmere White" granite I picked last February. Alas, with the economy as it is, that is off the books until some time in the uncertain diststant future. The kitchen desperately needed a paint job to be less dumpy and more tolerable until the remodel finally happens.

Picking a color has not been an easy task. The reason for this is that there is a complex set of variables to influence this decision. In one corner, I have the new white cabinets with honey colored beech butcherblock counterop. In the other corner, I have the dingy old cabinets with a cheap blue formica counterop. Underfoot is a hideous yellow/brown/olive linoleum tile that I plan to replace with a pretty stone-like linoleum tile when I can afford it (see previos post about recent pay cut coupled with some emergency expenses). The adjoining living room is a muted yellow that sometimes looks olive.

Back in October, I found what I thought was a pretty blue for the living room. It was way too cold for that room since it gets very little light. I slapped up some swatches in the kitchen, and while it blended with the formica quite nicely, I was certain it would be positively FROSTY in there if I did the whole room.

I'd pull a few paint chips on every trip to the hardware store, and amassed quite a stack of them. I have been staring at those chips for the kitchen for at least 3 months with nothing really standing out as the obvious choice. All the greens I picked seemed to clash with the blue, all the tan/taupe/brown/beige looked sickly next to the butcherblock, and nothing was going to make the hideous lino look any better.

This weekend I finally had two full days to commit to the project and got started with priming ceiling and walls, then painted the ceiling, all without having a clue what color to pick. I had somewhat resigned myself to the fact that it likely needed to be blue, and was leaning toward a really pretty, saturated, bold blue that was not dark (basically, as warm a a BLUE can be, which is not very)

Then I called my friend Billy (the artist) and asked him for a consult. I brought with me my stack of paint chips, a sample chip of the formica that I picked up at Home Depot, the chip of my living room color, the four contenders of replacement floor tile, and pried up a loose tile of the current linoleum (we used the hardwood floor at his house to approximate the butcherblock).

Billy, Kat and I looked at color combos for probably an hour. Amazingly, Billy was able to find not one good choice, but THREE amazing choices. All green, all lovely next to the blue, existing lino, and future lino (helps to have that decision made now too!). We identified them as "bright and perky," "tranquil and safe" and "potentially dark and moody."

I dashed home and taped them all to the wall that is visible from the living room. I looked at them for 10 seconds and made up my mind. The "bright and perky" choice (appropriately named "Gleeful Green") seemed like it might be TOO perky for my little space, so I chose the "tranquil and safe."

Not only did Billy give me the cheery green kitchen I had been hoping for, but he also paired each green with a suitable blue that I can use on the wall behind the formica counter to tie it all together and add some interest. Amazing!

After all that description, here are a few pictures of it after the first coat:


OK, time to go start the second coat!

Tuesday, March 10, 2009

Unplanned Improvement

Last Tuesday night I went through the laundry room to go out the side door and thought, "Wow, it's really warm and humid in here." That was quickly followed by, "I'm not running laundry" and an inspection of the water heater. Sure enough, it was leaking. Fortunately, it had a drip pan under it, so I had not flooded the inside of my house. I promptly hopped in the shower to 1) shower and 2) use up all the hot water in the tank before I turned it off.

I booked several plumbers to come out on Wednesday to give me quotes and the one I booked could not make it out until Friday to do the installation. Even without hot water, I decided to wait for him anyway because he was great. He listened to my concerns of conventional vs tankless now (Cha-ching! 3x the cost of conventional at a time when $$$ is already tight due to a recent pay cut) vs wasting the money and a perfectly good water heater when I finally get around to the big remodel. His opinion was don't do it twice, and do the installation of the tankless in a place that will be compatible with future remodeling. I was sold.

Anyway, when they came out to do the installation, they pondered how they were going to get the old unit out with the utility sink in the way. I told them I'm not at all attached to the sink and use it only because my washing machine drains into it. They could remove it to make it easier to get the old tank out, IF they would help me set up a standpipe for draining the washer. They paused and said, "We don't usually do that since we do just water heaters, but since it will make it easier on us, we'll do it for you," and then told me what supplies I'd need to get.

It took all day, but the added bonus is that my laundry room is suddenly VERY spacious. I'm gearing up to paint it and the kitchen in the coming weeks and then will install some cupboards/shelves in the nook where the old water heater was and will suddenly have a massive amount of storage for pantry and cleaning supplies. I can't wait!

Sunday, February 22, 2009

Sometimes I even impress myself

As I have mentioned several times, The Dump suffers from a lack of gutters on two sides. This leads to a lot of water hitting the ground and sitting there right next to the foundation. This means it makes its way into the crawlspace, which has been the source of much stress and frustration. It REALLY stressed me out last year, and this year I was trying to tell myself I was prepared for the inevitable cycle of rain and pumping.

Back in late summer, I thought to install gutters before the rains started, but didn't because it seemed very likely I'd do my foundation work (including a super powerful system to remove water from the property) and a new roof. Alas, the economy tanked way more than expected and I decided I needed to keep that cash in my pocket.

After the doozie of a storm we had last weekend and the out-of-control stress I felt this week with all the pumping it required, I decided I needed to get some gutters up before the next storm rolled in. So, I downloaded some how-to info from ThisOldHouse.com, went shopping for supplies Friday night and skipped my run Saturday morning to get an early start on what I suspected would be a long project.

I have to admit, I consider most of my home improvement projects thus far to be pretty entry level and was a bit concerned about my ability to execute on this one. But execute I most certainly did. Because I was racing against mother nature, and my doubt about taking on a project of this magnitude, I opted for the slightly more expensive vinyl gutter system that snaps together with rubber gaskets at the joins instead of cementing with metal or plastic adhesive. So easy!

I got about 40' of gutters hung without too much cussing and without falling off the ladder. I ran out of gas and did not finish the task (have a 12' and a 7' section left), but am really pleased with what I accomplished.

Sure enough, it started to rain while we were out to dinner and I could not wait to get home to see how they were holding up. Instead of a waterfall off the roof, I heard water gushing down the downspout and out the end of the 12' diverter tube that takes it away fromt he foundation. Yippee!!!!!

It rained most of the night and a good chunk of today and my crawlspace is NOT full of water as I was expecting it to be. Maybe we didn't have enough rain to create saturated conditions (though he soil was still saturated from the last storm, even with 4 dry days in between) , but maybe the gutters are a big chunk of the solution to my water problem. Not bad for $150 in supplies and 6 hours of work.

And because I am THAT much of a geek, here's a photo:
On tap for next weekend: painting the kitchen.

Sunday, February 15, 2009

Rainy day progress

As I type this, Redwood City is approaching 2" of rain in a 24 hour period. I'm not joking when I say it has been raining ALL day. I know our nearly-empty reservoirs desperately need it, and for that I am grateful for it to be raining.

Alas, also as I type this, I have a pump running because my crawlspace is once again full of water. This is partly (mostly) due to The Dump's lack of adequate drainage, and also partly because Redwood City is relatively low, so when there is a lot of water in a short period, it isn't able to drain away very quickly. I am MUCH less stressed about this than I was last winter. It helps that my neighbor's crawl space is full too (yep, I stuck my head in there to satisfy my curiosity!) and he has sufficient gutters.

Truth be told, I was really hoping to hold out on the pumping because my rain barrels are scheduled to arrive tomorrow. Since we're perilously close to a drought, I wanted to be a good citizen and attempt to collect as much rainwater as possible for the rest of the rainy season to use in my garden when the inevitable water rationing starts (or at least be a good citizen even if there is no rationing) and pumping the crawlspace into a barrel seemed like a good way to start.

In any event, I've been indoors all day and spent most of that day scraping the 50-some odd years of wax buildup from the hall floor. This has been ongoing for about 6 months, but it's a mind-numbingly boring task, slow on visible progress, and hard on the hands, so it's always at the bottom of the to-do list. I'd tackled the hardware on the kitchen cabinets last night, so there was nothing else that seemed like a reasonable one-day project, and the wet weather meant painting was out since it would take ages to dry, so a-scraping I went.

I wish I could say a full day of work led to a miraculous transformation, but they went from bad to worse before starting to look better.

The wax was really thick and grimy at the edges, but that's where it has scraped up more readily. After making progress with the 12" on either side, I covered it with a runner and ignored it for a while since the visible parts were quite nice looking. :)

The central traffic area was smooth and most resistant to scraping off, but quite discolored compared to the exposed perimeter. After a few hours of scraping, I decided to give the chemical wax stripper a go. Not the smartest thing on a day when I can't open all the windows of the house to ventilate, but I had a one track mind about the floor. I'm less than impressed with the results, even after going at it with steel wool with plenty of the solvent.

After letting them dry, I used Johnson One Step Floor Wax which is supposed to clean and wax in one step (duh) with no buffing required. It claims to be able to remove wax too, but I knew it was no match for the amount of buildup on my floors. The label said it wound dry shiny and if it did not, that meant there was wax buildup that needed to be removed. My floors are not shiny, so there is more scraping/scubbing in my future. I think I'm going to see if I can find a brillo-type pad to attach to the sander to save my hands a bit.

Since I don't have a photo-worthy hall floor, I'll leave you with a photo of the new kitchen cabinets complete with hardware and butcher block top:
More progress to come, eventually. Painting the kitchen is near the top of the to-do list when we get a dry spell.

Friday, January 23, 2009

Kitchen updates

I've been holding off on posting about my progress over the holidays because I have not finished the kitchen project. I had a few technical hurdles and a business trip get in the way.

In December I decided that Ol' Betty (the 1950's stove) had to go. I was tired of not being able to bake to my heart's content, and she really was big for the tiny kitchen. In addition to being 34.5" wide, she stuck out into the room a good 6" due to the location of the gas inlet. Too big, too big, too big.

I demolished the existing cabinet to the right of Betty (the drawers were falling apart) and assembled two base units from Ikea to go on either side of the new stove. Alas, the gas inlet is problematic with the new stove too, so I decided not to do countertops and final positioning until I got that resolved. After some exploratory cuts int he dryway, I decided rerouting the gas line is a task best left to a professional. He's coming tomorrow to do that, and the rest of the day will be spent installing the countertop and drawer hardware.

Here's the current situation:
I'm hopeful that I'll be posting completion by the end of the weekend. It does involve using a new power tool (circular saw), so there could be some unexpected challenges.